Azure Container Apps
Azure Container Apps is a fully-managed serverless compute service in Azure that simplifies the deployment of containerized applications without having to manage the underlying infrastructure. It allows you to package your application as a container image and deploy it to Azure, where it can be managed as a fully-managed platform-as-a-service (PaaS) offering.
With Azure Container Apps, you can deploy your application as a container image from a variety of sources, including Azure Container Registry, Docker Hub, or any other public or private container registry. You can also choose from a variety of deployment options, including deploying your application to a Kubernetes cluster or deploying it as a standalone container instance.
How to Create an Azure Container App?
To create an Azure Container App, you can follow these steps
1. Sign in to the Azure portal (https://portal.azure.com/).
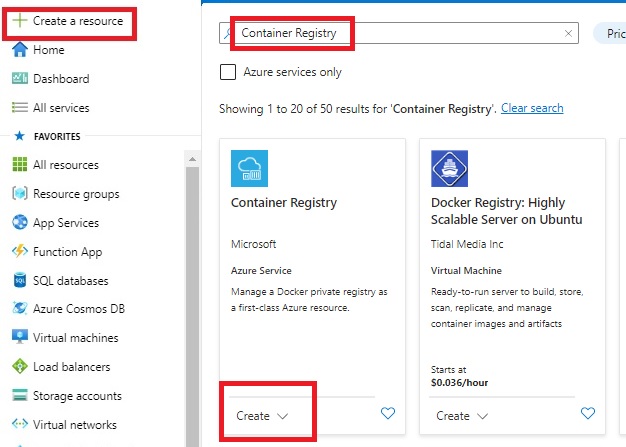
2. Click on the "+ Create a resource" button and search for "Container Apps" in the search bar.
3. Click on "Container Apps" in the search results and then click on the "Create" button.

4. In the "Basics" tab, enter a name for your Container App, choose the subscription, resource group, and location where you want to deploy it.
5. In the "Image Configuration" tab, select the container image source from which you want to deploy your container app. You can choose from Azure Container Registry, Docker Hub, or any other public or private container registry.
6. In the "Instance Configuration" tab, specify the CPU and memory requirements for your container app. You can also choose the deployment option for your container app, such as standalone container instances or a Kubernetes cluster.
7. In the "Networking" tab, specify the networking configuration for your container app, including the virtual network, subnet, and IP address.
8. In the "Review + create" tab, review your settings and then click on the "Create" button to create your Azure Container App.
9. Once your Azure Container App is created, you can deploy your container image to it and start using it. You can also manage and scale your container app from the Azure portal or through the Azure CLI.
How to deploy a container in Azure Container Apps?
To deploy a container to Azure Container Apps, you can follow these steps
1. Create a container image for your application using Docker or any other containerization tool.
2. Upload your container image to a container registry such as Azure Container Registry, Docker Hub, or any other public or private container registry.
3. Sign in to the Azure portal (https://portal.azure.com/).
4. Navigate to your Azure Container App in the portal.
5. Click on the "Deploy" button on the top navigation bar.
6. In the "Deploy" blade, select the container image source you want to use, such as Azure Container Registry, and then select the image and tag you want to deploy.
7. In the "Configuration" section, specify the required environment variables, command line arguments, and other configuration settings for your container.
8. Click on the "Review + create" button to review your deployment settings.
9. Click on the "Create" button to deploy your container to Azure Container Apps.
Azure Container Apps Best Practices
Here are some best practices to consider when working with Azure Container Apps
Use a version control system
Use a version control system like Git to manage the source code of your application and version your container images. This makes it easy to roll back to previous versions and ensures that all changes are tracked and auditable.
Optimize container images
Keep container images as small as possible by removing unnecessary packages and dependencies. This reduces the size of your images and speeds up deployment times.
Implement security best practices
Follow security best practices to protect your container images and the data they contain. Use secure passwords, enable SSL, and restrict access to your container registry.
Use managed services
Use managed services like Azure Container Registry and Azure Kubernetes Service to reduce the management overhead and improve the reliability and scalability of your applications.
Monitor application performance
Monitor the performance of your containerized applications using tools like Azure Monitor to identify and fix performance issues.
Scale efficiently
Use auto-scaling features to scale your container instances up or down based on demand. This helps you optimize resource utilization and reduce costs.
Backup and restore
Backup your data and application configuration regularly and store them in a separate location. This ensures that you can recover your data and application in the event of a disaster.
By following these best practices, you can improve the reliability, scalability, and security of your Azure Container Apps deployment.
Steps to troubleshoot issues related to Azure Container App?
Steps to follow if you encounter issues with your Azure Container App
1. Use the Azure portal or the Azure CLI to view the logs for your container instances. This can help you identify any errors or issues with your container.
2. If your application generates its own logs, check these logs to identify any issues with your application code or configuration.
3. Ensure that your container instances can connect to the required services and endpoints, such as databases or APIs. You can use tools like ping or telnet to test network connectivity.
4. Check the resource utilization of your container instances to ensure that they have enough CPU, memory, and disk space. You can use tools like Azure Monitor to view resource utilization metrics.
5. Ensure that your container image is compatible with the runtime environment of your container instances. Check the documentation for your container runtime to ensure that you are using the correct version of the runtime.
6. Check for updates to your container images, application code, and dependencies. Outdated images or dependencies can cause issues with your application.
7. Check the documentation and support forums for your container runtime and other Azure services that your application uses. There may be known issues or workarounds for the issues you are encountering.
By following these troubleshooting steps, you can identify and resolve issues with your Azure Container App deployment. If you are still unable to resolve the issue, you can contact Microsoft support for assistance.
Azure Container Apps Pricing Model
Azure Container Apps pricing is based on the number of instances and the amount of compute resources used. There are two pricing model available, Basic and Premium.
The Basic model is designed for low traffic workloads and offers a fixed price per instance per hour. The price is based on the size of the instance, ranging from 1 vCPU with 2 GB of RAM to 4 vCPUs with 16 GB of RAM.
The Premium model is designed for high traffic workloads and offers more advanced features like auto-scaling and automatic load balancing. The price is based on the amount of vCPU and memory resources used per second, with a minimum of 1 vCPU and 2 GB of memory.
Both models include a free allocation of up to 10 container instances per month. Additional instances beyond the free allocation are charged based on usage.
There are also additional charges for other services that may be used in conjunction with Azure Container Apps, such as Azure Container Registry for storing container images, Azure Monitor for monitoring, and Azure Storage for persistent data storage.

Comments
Post a Comment